Monday, January 18, 2010

Photographing a Photographer

A few months ago, I assisted for Eugene Biscardi. It was a great learning experience. Most of the knowledge gained from that day was how a fairly large production works. The crew consisted of the photographer, his personal assistant, an assistant, two photo interns (assistants to the assistant?), stand-in model, stylist, and three people for hair and make-up. I've never worked in a crew this big before. That's 10 people to photograph one person!

The shoot encountered some technical problems, and we ended up using my gear. Eugene was very grateful for this and kept saying I saved that shoot. I never saw the end product of this shoot, and I couldn't remember the name of the actress either.

Eugene contacted me last week since he needs a recent photo to be used in a ... I forgot. Somebody else's website. Anyhow, I readily agreed although it was quite intimidating. Photographing a photographer can not be easy. He knows what I'm doing coupled with the fact that I have worked for him before, I did not want him to control the shoot. Upon showing up my fears were confirmed. He already had the shot and location in mind. What I didn't want to do was show up and just press a button. There was a bit of role reversal - I, the photographer, was the stiff one while he, the subject, was relaxed. However, when I started prepping the gear - camera, lens, lights, etc., he eased up on the coaching and let me do my thing. I'm glad he gave me freedom with the lighting, which boosted my confidence.

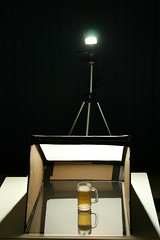
Since the location required a half a block walk, I decided to use one light. I used the Alien Bees ABR800 Ringflash with the 30" Moon Unit, powered by a Vagabond II. This has been my go-to light as of late. It is compact and light (as opposed to my Calumet Travelites - which ironically, does not travel light) and it gives me two options - use it as a ringflash or as an off-camera flash. Plus, I can use it on a boom. I'm quite fearful about using the Travelite 750 on a boom. The Moon Unit's light has been compared to a beauty dish. I don't use a beauty dish much, so I can't really tell.

Here is the lighting set up:

EB-Setup

It was 4pm and we were chasing light, so I decided to go with a natural light look. I learned a lot throughout this shoot in terms of posing and interacting with the subject. Its a great help as I always thought that was my weak point. This was our end product:

EB-9634 B copy

He was really happy with the photo ... from a crew of one.

The Fly Pelicans

FP-9536

This newly formed group needed a photo for a promo quickly. I agreed to an impromptu shoot at one of the member's home. It was pretty much a quick set-up using a black velour backdrop created for me by My Friend Glen. I love this "backdrop" - its actually two pieces of 4' wide velour fabric seamed together. It will photograph as black as long as the light/s do not reach it.

Lighting set-up:
FP-Setup

The key light was the Calumet Travelite 750 with the medium softbox. The Alien Bees ABR800 Ringflash was the fill light and was set up at a very low power level. The other Travelite 750 with a gridded stripbox provided a little bit of separation from the backdrop.

I shot the members individually as well using almost the same set-up, except that the strip light was moved to camera-left behind the subject/s.

FP-9601PS

FP-9556 copy

FP-9541

FP-9544

Friday, January 8, 2010

Mr. Hal Bergman

IN-9469

Between Christmas Day and New Year's Eve, I had an opportunity to shoot with Hal Bergman. Hal, a fantastic photographer, does a lot of industrial stock photography.

Hal at work:
Hal
Hal was using my Canon TS-E 24mm f/3.5L, so I had to use another version of a shift camera - camera on a tripod on top of a picnic table.

Hal suggested bracketing, so I did. With three exposures, I dabbled with HDR:
IN-9480

Few other shots from the rest of the night:
Rail Bridge

IN-9483

IN-9477

Thursday, December 31, 2009

Downtown Los Angeles


With the holidays unleashing its wrath, I had little to none when it came to photography projects. My hands were itching to handle a camera. So, on a chilly Los Angeles night, I braved the cold and drove around to take photos of the Downtown L.A. skyline. It always looks nice and clean on the day after it rains. I guess the rain washes the smog away? Interestingly and appropriately, LA by Milky Soul was the first song that came on the iPod when I headed out.

First stop was the top of the hill in my neighborhood. This is located on top of White Knoll Street (I might be wrong).

LAD-9390

LAD-9386

With the above photo (as well as the header photo), I used the Canon TS-E 24mm f/3.5L tilt-shift lens. I figured I would practice on my selective focusing and didn't take it off for the rest of my expedition that night.

Then, I drove down the hill to Beaudry where it crosses 3rd to 6th. You can walk to 3rd, 4th, and 6th on the freeway overpasses. This overlooks the 110 Freeway. With these photos, I played around with the white balance and took advantage of the mixed ambient light to produce funky colors.

LAD-9399

LAD-9419

LAD-9423

Thank you for looking, I hope you appreciate my work. You can find more of my stuff on Flickr!

Wednesday, October 14, 2009

Cigarettes and Alcohol


Do-It-Yourself projects are a big part of being an avid strobist. Projects range from macro studios, grids, snoots, and other creative light modifiers. My first attempt at a DIY project was the cardboard snoot. More than a year later, I'm still using that snoot. I've made a couple more but the original one, made of cardboard and gaffers tape, is still a staple in my lighting bag.

The task at hand is the Lunch Box. I carved out my box like it was Halloween and it took me thirty minutes to get to this point:

I reinforced the edges with gaffers tape. My choices for the diffusion material were limited to Rosco Tough Frost or Lee Hollywood Frost. These were the only ones I could gather without paying for them. David Hobby, the OG Strobist, used the Rosco Tough Frost. I decided to follow his lead, since it had better opacity. I adhered the gel to my box using more Gaffers Tape.

This box should be good for flatter objects shot a little bit higher than the subject. While a cold frosty mug of beer is not the ideal subject, I felt I had accomplished something and thought that I should reward myself. Here are my test shots:
IMG_7068IMG_7071


These shots were lit by a Vivitar 285 and triggered with a Pocket Wizard.The first shot was on a white foam board. The second was with a piece of plexiglass on top of the white foam board. The third, on a black foam board. The fourth, on a black foamboard with plexiglass. The set-up shot pictured on the right was for the fourth shot.

After writing this blog entry, I felt I deserved another reward ...